Last updated: October 24, 2026
The right outdoor kitchen storage solution keeps utensils, dishes, and fuel close at hand, dry enough to stay useful, and separate enough to stay safe. For Outdoor kitchen storage ideas for utensils, dishes, and fuel, the quick answer is this: use three zones, keep daily tools within one arm’s reach, and give the propane tank its own ventilated compartment. A grill station that looks organized on day one can turn messy fast if tongs, plates, and a propane tank all end up in the same cabinet.
Start with three storage zones: cook, serve, fuel
A good outdoor kitchen storage solution works best when it is split into three zones: one for cooking tools, one for dishes and serving, and one for fuel. That separation keeps the things you reach for every day in the easiest spot and keeps the propane tank away from fragile items and heat.
The simplest way to think about the layout is by task. Put the tools you use at the grill within one arm’s reach of the cooking surface. Put plates, bowls, napkins, and serving pieces closer to the door to the house or patio table. Put the propane tank in its own ventilated cabinet or compartment designed for gas storage, never in a drawer with accessories or under a stack of dishware.
A generic cabinet plan often fails because it treats every item as if it can live anywhere, so it is wise to consult a professional if you are unsure about cabinet loads, ventilation, or gas clearances; outdoor kitchen design guidance from NFI and manufacturer instructions for propane equipment are the safest references. Utensils are long and awkward. Dishes chip when they slide around. Fuel needs airflow and clearance. The fix is to assign each category a home before you buy bins or dividers.
Use this order when planning the storage:
- List the items you reach for during one cookout, such as tongs, spatulas, plates, and lighter tools, then keep those items in the most accessible cabinet.
- Measure the biggest item in each group, especially platter length, cutting boards, and grill brushes, so the cabinet depth and drawer height match real objects instead of estimates.
- Reserve one dedicated bay for the propane tank if the grill uses it, and keep that bay free of drawers, trays, and loose bins.
- Group smaller items in a drawer organizer or accessory bin so they do not rattle into a single tangled pile.
- Leave one empty shelf or drawer for overflow, because outdoor storage fills faster than indoor storage and seldom shrinks after the first season.
This is the method to follow if you want your outdoor kitchen storage ideas to stay practical after the first month. It is not the right approach if the outdoor space is only for occasional serving and never for actual cooking; in that case, a single cabinet may be enough. For broader planning, the hub page, Planning an outdoor kitchen project — The Complete Guide, sits upstream of these storage choices.
What belongs in utensil storage?
Utensil storage should hold the tools you grab every time you cook, not every gadget you own. A workable setup usually separates long-handled tools, smaller hand tools, and backup items so the cabinet does not become a jumble after two weekends.
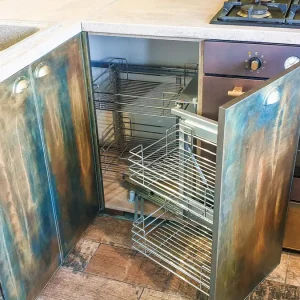
Think in layers. Long items such as tongs, spatulas, grill forks, and basting brushes belong in a tall drawer or a shallow upright bin. Small tools such as thermometers, skewers, bottle openers, and lighters fit better in a drawer organizer with short compartments. Cleaning tools such as grill brushes and microfiber cloths deserve their own section because they are dirty and tend to cross-contaminate clean utensils.
A 12-inch drawer can work for basic tools if the handles lie flat, but a deeper drawer is easier for mixed utensil sets. If the cabinet has only one shelf, use an accessory bin with handles so the whole set can come out at once. That matters when the grill area gets crowded and you need one thing quickly.
The mistake to avoid is storing every small cooking accessory loose in a single drawer. The cost is time: you spend a minute fishing for a thermometer while food keeps cooking. The fix is a cutlery tray or adjustable divider that creates narrow lanes for small tools. A cutlery tray is not just for indoor silverware; it works well for skewers, corn holders, and tasting spoons too, as long as the compartments match the item length.
Outdoor utensil storage also needs cleaning in mind. Metal and washable plastic are safer bets for a space that sees heat, dust, and occasional rain. Fabric pouches, cardboard trays, and unsealed baskets usually break down quickly outdoors.
How do you organize an outdoor kitchen?
You organize an outdoor kitchen by putting the most-used items between waist height and eye level, then keeping heavier or messier items lower down. That makes the space faster to use and reduces bending, reaching, and cabinet clutter.
Here is a simple cabinet organization pattern that works for many layouts:
- Use the uppermost accessible shelf for dishes, serving bowls, and light items you want clean and ready.
- Put everyday utensils in the drawer closest to the grill, using a drawer organizer to split cooking tools from small accessories.
- Store less-used pieces such as large platters, extra napkins, and backup serving trays on a middle shelf or in a second cabinet.
- Keep cleaning supplies, spare grill gloves, and charcoal tools in one lower section so dirty items do not mix with food-contact items.
- Assign one labeled accessory bin for odds and ends like skewers, meat hooks, matches, and thermometers so they do not spread across multiple drawers.
The label matters more outdoors than indoors because items move in and out of the kitchen more often. A simple waterproof label on the front edge of a bin can save a lot of searching during a busy cookout. If a cabinet has deep shelves, use pull-out trays or stackable containers so the back corner does not become dead space.
One honest limitation: not every outdoor cabinet is good for every item. Deep base cabinets are useful for bulky serving ware, but they are poor for tiny accessories unless you add dividers. Open shelving looks attractive, yet it exposes dishes to dust, pollen, and moisture. That style is better for frequent-use serving pieces in a covered patio than for anything that must stay spotless.
The same goes for dishes. Stack plates with a soft separator or place them in a dedicated dish cabinet where the stack will not shift every time a drawer closes. Bowls and mugs can nest, but leave enough space to lift the top piece without scraping the one below it. A few inches of clear space is often more useful than another crowded shelf.
Dish storage that keeps plates clean and unchipped
Dish storage should keep plates, bowls, and serving pieces dry, stacked, and easy to lift with one hand. That usually means a closed dish cabinet rather than open shelving, especially in a windy or dusty yard.
The best dish cabinet usually has a shelf height that matches the real stack, not a guessed one. If your dinner plates are around 10 to 11 inches wide, a shelf that gives them a little clearance above the stack is easier to use than one that fits them exactly. A fixed shelf can work, but adjustable shelves are better because serving bowls and platters vary more than people expect.
Use stackable separators or slim anti-slip liners between layers of plates if the cabinet gets bumped often. That reduces edge chipping and keeps the stack from sliding forward when the door opens. For glassware or mugs, place heavier items on the lower shelf so they do not fall from shoulder height. If you only have one cabinet, keep dishes above utensils and fuel, not beside them.
A common mistake is storing dishes right under the grill opening or beside the most exposed burner wall. Heat and splatter shorten the useful life of the cabinet space and leave the contents feeling grimy. The fix is to move dish storage one bay farther from the hot zone and reserve the hotter cabinet for tools or heat-tolerant items only.
If the outdoor kitchen is uncovered, protect dish storage with a door that seals well and a shelf that sits off the cabinet floor. That small clearance helps if moisture gets inside after rain or washing down the patio. A dish cabinet does not need to be fancy; it needs to keep clean items clean. That is the whole job.
Where does the propane tank go?
The propane tank goes in its own ventilated storage compartment designed for fuel, never in a general-purpose cabinet packed with dishes or utensils. That separation is the safest and most practical way to store a tank outdoors.
A propane tank cabinet should allow airflow and easy access to the valve. It should not trap gas, heat, or loose items. The tank also needs to sit upright and stable, with enough room to connect, disconnect, and inspect the hose without dragging other contents out of the way. A dedicated bay built for fuel storage does that better than any improvised shelf.
Do not place the propane tank next to paper goods, dish towels, or plastic bins. The problem is not only heat; it is the risk of clutter around equipment that needs a clear path. A tank tucked behind stackable containers is a nuisance every time it needs replacing, and it encourages people to leave the cabinet jammed shut. If the storage door has to be forced closed, the setup is wrong.
For many outdoor kitchens, the fuel zone is the least flexible part of the plan. If the design does not have room for a proper tank compartment, the better answer is to keep the tank in the open, in the location recommended by the grill manufacturer, rather than squeeze it into a random cabinet. This is one area where a neat look is less important than safe access.
That is the main trade-off with propane storage: it takes space that cannot be repurposed for dishes or tools. A cabinet that looks efficient on paper may be a poor choice if it cannot safely hold a tank upright and accessible. If the fuel zone is too small, redesign the cabinet rather than force the fit. That is the piece many generic guides skip, and it is the one that matters most here.
Smart cabinet organization for tools, dishes, and fuel
Smart cabinet organization uses fewer containers than people expect and gives each one a clear job. The goal is not to fill every inch; the goal is to stop the same item from living in three different places.
Start with one drawer organizer for small tools, one accessory bin for loose grilling parts, and one dish cabinet for clean serving pieces. Then give the propane tank a separate ventilated compartment. If you add a second bin, make it a backup space for rarely used items such as extra skewers, spare gloves, or seasonal serving platters. More bins usually create more sorting, not less.
A useful rule is to keep the daily items in the top 30 to 36 inches of the storage zone, where they can be reached without crouching. Heavier items and cleaning supplies can go lower. That vertical logic matters more than the cabinet brand or finish. A plain base cabinet with well-placed inserts often works better than an elaborate setup with no internal structure.
The main mistake is overfilling the system at the start. An outdoor kitchen that is packed to the door edge leaves no room for tongs returned at odd angles, a stack of new paper plates, or a larger serving bowl later in the season. The cost is constant reorganization. The fix is to leave one “overflow” shelf or drawer empty on purpose.
If the storage area sits in a damp climate or a windy patio, choose closed cabinets over open racks for dishes and utensils. Open racks can look tidy for a week and then collect grit, pollen, and splash. That design is wrong for anyone who wants low-maintenance storage rather than display.
The storage setup that lasts through a season
The storage setup that lasts is the one that matches how often you cook, how many people you serve, and whether the space is covered. A small setup with a drawer organizer, a dish cabinet, and a proper propane bay beats a bigger system that is impossible to keep sorted.
If you cook weekly, prioritize access and durability over decorative extras. If you host large groups, add a second utensil drawer and a larger accessory bin so backup tools do not crowd the daily set. If the space is mostly for serving, put the emphasis on dishes and serving trays, then keep only a tight set of grill tools nearby. The right storage solution changes with use, not with square footage alone.
What I would not do is buy storage for every possible gadget before the kitchen is in use. That usually leads to half-empty drawers for one month and chaos by midsummer. Start with the core categories: utensils, dishes, fuel, and cleaning tools. Add more only if a real item has nowhere sensible to go.
There is one more honest limitation. No storage plan fixes an outdoor kitchen that has no protection from rain, sun, or debris. Closed cabinets help, but they are not a substitute for sensible placement under a roof or overhang. If the area is fully exposed, the storage needs to be simpler and easier to wipe out.
For a reader building from scratch, the most reliable outdoor kitchen storage ideas are also the least flashy: a clean dish cabinet, a drawer organizer for utensils, an accessory bin for small parts, and a separate propane tank compartment. That combination keeps the important things easy to reach and the dangerous or fragile things where they belong.
Key Takeaways
- Split the space into cooking tools, serving ware, and fuel before buying cabinets or bins.
- Keep the most-used utensils within easy reach of the grill and store small parts in a drawer organizer.
- Use a dish cabinet for plates and bowls so they stay cleaner and chip less.
- Give the propane tank its own ventilated compartment and do not mix it with food items or loose accessories.
- Leave one empty drawer or shelf for overflow so the system does not collapse as soon as guests show up.
What should you store in an outdoor kitchen?
Store the items you use to cook, serve, and reset the space after cooking. That usually means utensils, dishes, serving pieces, napkins, grill accessories, and a dedicated spot for the propane tank if the grill uses one. Keep fragile dishes separate from grease-prone tools and store small items in a drawer organizer or accessory bin.
How do you organize an outdoor kitchen?
Organize an outdoor kitchen by frequency of use and by category. Put daily tools near the grill, dishes in a closed cabinet, small items in labeled bins or a cutlery tray, and fuel in its own ventilated compartment. The easiest setup is the one that keeps each item in one place and prevents mixing clean items with dirty ones.
Drafted with AI; not yet reviewed by a person.